Tuesday, March 30, 2010

Go van Gogh

Photobucket

Happy Birthday Vincent van Gogh! You crazy Dutch post-impressionist! You were a pioneer for the modern art movement and you had no idea how your works of art would be enjoyed for so many years to come!

Although van Gogh was known for his use of vibrant colors, in this toddler class I decided to go pastel for Easter bunny fun. These works are in celebration of van Gogh, not representational of his work. It was a lot of fun for the kids.

We talked a little about van Gogh and read a fun book, Trucks Go. This book is filled with fun sound effects that all the kids enjoyed.
We discussed our museum manners and were off to visit the galleries. Back in the classroom we used things that "go" to cover our paper!

First we used brayers. This just doesn't get old. Kids love rolling paint! Then I had a bucket of cars, trucks and more to roll through paint and on to our paper. Find some wheels with different track marks. That means more fun.

Photobucket

Pick some different colors and let loose!

Wouldn't these be fun cut out as easter eggs? yes!

Photobucket

You will need:
-paper. Heavier is best for the little ones as they will roll through thin paper.
-tape to make the paper stay put for the rolling frenzy
-paint whatever colors you have
-things that "GO!"

Here are some of our works. Start your engines! VROOM!

Photobucket

Photobucket

Photobucket

Photobucket

Photobucket

Where has the time gone?

Photobucket

I have not had any new posts in a while as I have been busy! I had a wonderful Spring Break with my boys-we kept busy doing projects, playing games, having playdates, lunches, and some outings with friends that included going to the OKCMOA, Science Museum Oklahoma, Arbuckle Wilderness and the Jasmine Moran Children's Museum.

On top of that I was really busy working on the above painting for the Allied Arts fundraiser, ARTini. I mentioned I was lucky to be one of 25 artists chosen to be in this event. The painting needed to be finished by the end of April in time for the show, but then I was asked if I could finish the piece early (YESTERDAY!) to be included in a photo shoot for publication with Southwestern Publishing-they put out several local mags- Downtown Living, NW Style and several others. Needless to say, I could not turn down the amazing opportunity. The painting was finished in time due to long hours, a supportive husband and the photo shoot is done. We shot at the OKCMOA yesterday and I hope it turned out alright-I was really nervous! It is for an article about the event and will be in the May issue-all I can say is Lindsay at Allied rocks. I thank her for setting it all up!

This painting is the last of my Montana Series. I am going to start putting a new collection together and I think my will focus on Western Oklahoma. You can also see I am still posting "my art" posts here. I don't have a separate blog/website set up yet. I hope to have that done sometime soon-it's hard to figure out how I want to set it up. When it comes together, I promise you all will be some of the first to know! Thanks for reading and letting me share the fun news. Live Creative!

Wednesday, March 17, 2010

Visiting an Art Museum

Photobucket

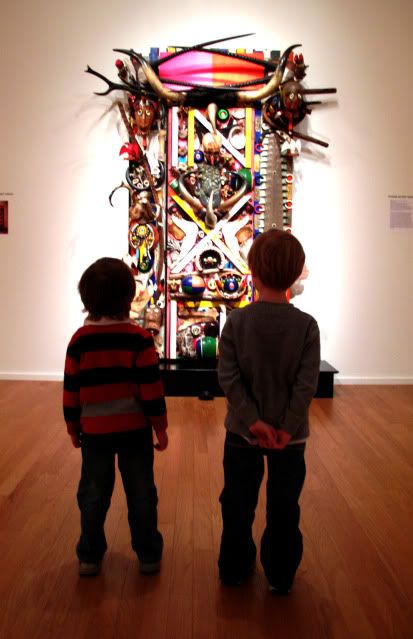
Yesterday I took my boys to the OKCMOA. It is one of their favorite places to visit. We were getting inspiration ideas for projects at home this week. Here they are looking at a giant assemblage piece by Alfonso Ossorio, titled INXIT. We are going to create our own assemblage pieces at home later today.

People ask me all the time, "Are you insane? How do you take your kids to a Museum?" Visiting an Art Museum should be a fun experience for you and your child. I do teach young children at the OKCMOA, but I love to take my own children there as well.

I believe letting children see art at a young age is important. Some of my first memories are going to Galleries and Museums with my own parents. Bringing them to a Museum is also a good way to start showing them proper Museum manners. These ideas mainly apply to young children, but can easily be adapted for older children as well.

In reality your first visit may not go as you plan. They might forget the rules you put in place, but try again. I find the more you go, the more familiar and comfortable they become.

When planning your trip to a Museum make sure you go at a good time for your child, not what is a good time for you. Ex. Don't go at meltdown time...Go after a nap... Go after they have eaten.

When you check in to your Museum look into a Membership. They are usually pretty cost effective and offer discounts or reciprocity for other Museums locally and in other states. Also look into any children programs they offer like tours, classes and more.

See if your Museum offers anything for children. Our Museum offers a really cool backpack (The Discovery Pack) to check-out. It is filled with fun things to do during your visit. This is perfect for older children.

Know the Museum rules for where you are visiting. Some prohibit photography, food, etc. in certain areas.

Prepare your children for their visit. Read books about Museums, art, color, etc. before you go.

Go over your rules and expectations for visiting a Museum with your child. Small children might need to be reminded several times. I mention rules to our toddlers at least 3 times during our gallery walks. They also might do best in a stroller. Remember that short attention span! If they do well in one area, be sure to praise them for good behavior! I say, "you all are doing such a great job using walking feet today! Thank you!" Be vigilant in watching and being responsible for your child while you are there.

Some good rules to explain are:

1. Never touch the artwork. This is my number one rule. We use our eyes to look at the art. Never our hands. I still hold my 4 year olds hand. We use the buddy system! I say, "will you be my buddy? Hold my hand!" I make him responsible for me-he thinks it's fun. Before the trip we talk about why touching art is harmful-the oils on our fingertips leave marks that can ruin the artwork-not to mention the artwork can be fragile and touching could puncture a canvas. Kids can put their hands in their pockets, on their hips, even on their heads...just not on the walls, pedestals or artwork!

2. Stay 3 steps back. You will be less likely to run into trouble if you stay 3 steps back from the artwork. If you get close, they will get close. We have to try to set good examples.

3. Put on our walking feet! We are sure to put on our walking feet when we enter the museum. We never run, gallop, skip, jump, etc. in the galleries. Someone can trip, fall and hurt the artwork or even worse, themselves!

4. Use our quiet voices. We use our quiet voices so that everyone can enjoy their Museum visit. This applies to adults too! :)

5. Save the Snacks. Save the snacks to enjoy outside on a warm day or on your car ride home. Food and drinks can spill splatter and damage works of art. Food in the galleries can also attract bugs that can be harmful to artwork.

6. Don't forget to have fun. Play a game with your child. Before we go we pick a color of the day. It's our magic color to find in the Museum. This will continue to engage your child as you make your way through the galleries.

Photobucket

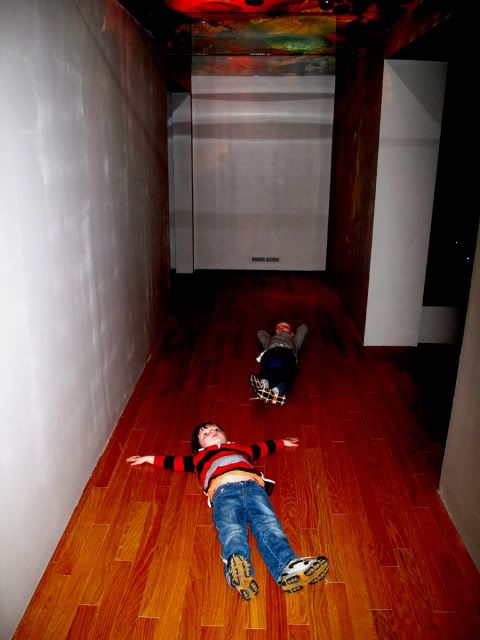
Here my boys are laying on the ground and looking up at Chihuly glass on the ceiling. They each found their favorite piece and told me about the shape and color of it. (My 6 year olds was a "green party hat" a beautiful green cone and my 4 year olds was a "swimming baby" one of the Pucci's.

If there is a bench, take a break! We will sit and play I Spy. Ask your child questions. There are so many questions from easy concepts for little ones like color, lines, texture and shapes to more difficult concepts for older children like harmony, balance, dimension and movement.

Let your children teach you. I try not to give my children my personal opinion of what I like or dislike. I want them to form their own opinion.

Nudity. That large naked statue is just around the corner. What do you do? Shield their eyes and run? Well, don't run! This decision is for the parent/adult to make. I try not to make a big deal about it and walk by it. However, lately my 6 year old has started giggling and will say something like, "Do you see his butt?" (love that Kindergarten potty humor!)I usually say something like, yes I see it. We all have one. It's just a body! I don't dwell on it and keep moving on.

Usually your kids will let you know when they've had enough! Take your new knowledge home to make a creation you were inspired by.

Get out there and enjoy the Arts!

p.s. educators-be sure to ask what is offered for you!

Sunday, March 14, 2010

Little Leprechauns

Photobucket

It was a fine couple of classes at the OKCMOA on Saturday morning to celebrate the coming of St. Patrick's Day. My little leprechauns ages 15-36 months arrived wearing green and were ready to visit the galleries and create! I began the class by inviting the kids to come sit on a big piece of green paper to read our story, The Luckiest St. Patrick's Day Ever.
After that I had a color experiment ready to demonstrate. I squeezed yellow and blue paint on a paper plate and talked about making green. I grabbed my paintbrush and slowly mixed the colors and OOH! AAH! Green!

Green was our color of the day and we visited the 3rd floor gallery to find the color of green in many shades and shapes. The final piece we looked at was a sculpture from the Vogel Collection that had a shamrock on it. It was an I spy object and was a good finishing moment to bid the gallery goodbye and head back down to the classroom to create our St. Patrick's Paintings.

I had paper plates with blue and yellow paint ready for the kids to mix with a paintbrush and put down on their paper. The fun part about this was to watch the different colors of green the toddlers made. Some was more yellow, some more blue. This made each piece even more unique.

Then I gave everyone a squeeze of kelly green paint and a small sponge. I like for the children to see that we can paint with different things and for ones this small it helps cover the paper a bit faster.

Our final color was white. I gave everyone a small amount of white paint and a feather to use to apply it. Everyone LOVED the feather. I used a more stiff craft feather-I found them at Walmart but I am sure you can get them anywhere.

Photobucket

To finish our St. Patty Paintings we used some leprechaun dust. I found shamrock, pot of gold, and star glitter at Michael's Craft Store. We sprinkled that on to complete our pieces! So much fun!

You will need:
-student grade watercolor paper
-yellow, blue, green and white tempera paints
-brush
-sponge
-feather
-glitter

Here are some of our toddler creations!

Photobucket

Photobucket

Photobucket

Photobucket

Photobucket

Photobucket

Photobucket

Abstract Animals

Photobucket

A class full of eager 3 year olds joined me at the OKCMOA for a fun class about animals. We gathered around and read the book, My Many Colored Days by Dr. Seuss. Not only is the book about colors and feelings, but it is full of animals. We enjoyed calling out the names of all the colors and animals.

After our story I line the kids up to prepare them to visit the galleries. We talk about our Museum manners-using our eyes and not our hands to look at the art, using our walking feet and quiet voices. The children did excellent. In the gallery we visited our 2nd floor collection and we found many animals. In one part of the gallery we sat down to play a game of I Spy. At this time I gave each of the children a chance to "Spy" something. It could be a color, animal or whatever! They really enjoyed this.

Back in the classroom we talked about animals we have at home. We talked about animal faces and what we needed to draw. (head, eyes, ears, body, details etc.) First we started with a black oil pastel to draw the outline of our animal. Then we used other colors to fill in details. To finish we used watercolors minus black and brown. I pull those colors out so they don't get too muddied.

Some children may not follow directions completely and do their own style of animal. I love it when this happens. It's okay to just let them enjoy and experience the materials. While an adult might think or say, that doesn't look like (whatever). I can listen to a child while they are creating and as they talk to themselves they ARE creating in this case, an animal. I watched a child draw big circles and say here is my dogs head. He is in the clouds. There is a rainbow. I believe this is a very important part of creating. Art is about the experience not just the end results so enjoy this special time full of imagination and wonderment with your own children!

You will need:
-student grade watercolor paper
-oil pastels
-watercolors
-brushes
-bowl of water

Here are some of our other creations!

Photobucket

Photobucket

Photobucket

Photobucket

Photobucket

Tuesday, March 9, 2010

Express Yourself


We have been talking a lot about how we express ourselves. Through body language, facial expression, voice, writing and art there are a lot of ways to do so! Right now at the OKCMOA a wonderful part of the permanent collection is on view through July 11th. Alfonso Ossorio: Gifts from the Ossorio Foundation are eleven pieces of various mediums that were donated to the Museum in 2008.

Ossorio, among many things was a Filipino American artist, an RISD student and friend of Jackson Pollock. I encourage you to learn more about this wonderful artist and if you are local, head to the Museum to see his work in person. The details cannot be appreciated by looking online alone.

His works are in a variety of mediums and with my boys today we focused on using wax, watercolor and ink. We are going to put together a cool assemblage piece later this week so stay tuned.

Here is what we did:

My boys are ages four and six. First we put out a big plastic tablecloth on the kitchen floor. We always wear old t-shirts to paint in. Then we used wax crayons on watercolor paper. Then I had my boys use watercolors. For fun we sprinkled on salt and let dry.

Photobucket

Photobucket

We hit them with a hairdryer to speed up the process. Then I gave them india ink in a squeeze bottle with a nib. (I used an eye dropper to fill it with ink.) You can improvise if the thought of ink scares you. My two boys, although young follow directions well and actually didn't get a drop anywhere but on the paper. You can use black tempera paint and brushes! Use the idea to suit what works best for you and the supplies you have on hand!

Photobucket

I bought the little squeeze bottles at Hobby Lobby. I am sure you can find them at most arts/craft stores with watercolor/paint supplies. My boys LOVED this part! This really made the pieces come alive. My 4 year old liked to squeeze the ink and scribble it in. My 6 year old was a bit more careful and really took his time. It was something new for them to try and I think matted and framed these will be extra special!

Photobucket

Photobucket

Photobucket

Photobucket

In the above photo you can see some of the salt detail.

You will need
-watercolor paper
-watercolors
-wax crayon
-paint brushes
-India Ink or tempera paint
-Squeeze bottle with nib.

I think next time we will use more ink instead of watercolors. I plan on experimenting a few times with this artist as inspiration over the next few weeks.

In other news I was excited to get a letter in the mail the other day from Allied Arts, asking me to donate a piece for their fundraiser, ARTini. I will be thrilled to do so and will keep you posted! I hope you have a creative day!

Tuesday, March 2, 2010

Hanging Sculptures

What a weekend! If you are local, chances are I saw you at the OKCMOA's super sized Family Day! It felt like the entire city was there. It was a huge crowd of all ages that enjoyed the many activities revolving around the Jason Peters exhibit.

Be sure to save the date for the next family day. It is Sat. May 22 and it will revolve around the next exhibit, Sketch to Screen: The Art of Hollywood Costume Design.

Amid the facepainting, scavenger hunts, story times and dance, there were 3 art activities featuring three different artists. I made hanging sculptures. (I'd say the average age of my little artists was age 4, and as young as 2.) We folded, bended, hole punched and cut a variety of papers and attached them to a strip of tagboard that we made into a circle. When we were finished, we punched 2 holes at the top and threaded some yard to hang these beautiful moving hanging sculptures. They turned out great!

Some of these kids really got creative. The little ones liked using the hole punch-that is a great fine motor skill for your little ones to build hand/muscle coordination!

Photobucket

While a glue stick is good for adding small things to the top of your sculpture, tape is instant hold and will hold the heavier items better. Thinking about Peters: Focus on using all scraps! You cut it, punch it, you use it! The punched areas also allow light to come through which is a fun feature.

You will need:
-strip of tagboard/posterboard for the top
-Variety of papers
-scissors
-hole punch
-yarn
-tape
-glue stick

Here are a few examples!

Photobucket

Photobucket

Photobucket

Photobucket

Photobucket

Photobucket

This last one is not hanging, but was a really interesting. She told me it was an homage to the artist, Jason Peters. They added pieces from the Museum handouts they got-including a Peters portrait, attached their exhibit tickets...very fun. Love to see people expand on a basic idea! This is why I do what I do. I love to watch creative minds at work!

Photobucket