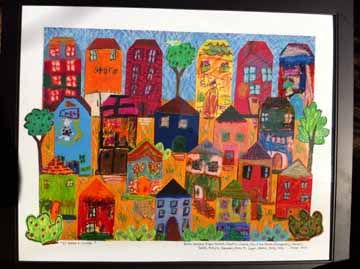
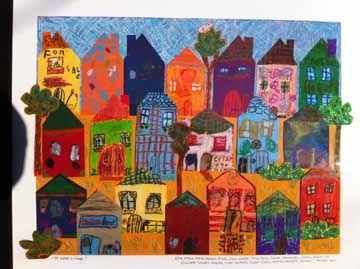
 For my son's school auction I lead the 1st grade art project I titled "It takes a Village." Thinking of how true that statement is for the auction alone. All the parents, teachers, businesses that donated items and more to put this fund-raising shindig together. My small part was a few man hours to complete two class projects that happily sold for quite a bit of money! (Both projects went for over $2,000 dollars!) This is money the school will use for new computers and classroom upgrades. So wonderful.
I wish I had taken better pictures of these pieces. They really did turn out so beautiful.


You can do this on your own!
You will need:
-colored card stock
-oil pastels
-scissors
-acid free glue dots
-framing optional
This is a collaboration piece. I pre-cut different shaped buildings from card stock. Children were instructed to use oil pastels to decorate their building as a home, store, apartment, etc. They were told to think about details like doors, windows, landscaping, shingles, etc.
I collected all the buildings and created a childlike background. The background was done on two pieces of pastel paper and colored on top of with oil pastel. I cut and colored trees and shrubs. All of the pieces were put down with acid free glue dots. The finished piece was 30x24 matted and framed. I think this would be cute on a small scale as well!


27 comments:
What a great piece of collaborative art - I love it! I can definitely see my girls and nieces making something like this for my parents for Christmas. Thanks for sharing!
I love the colors! Very cool project and I can see where it would be a lot of fun for the kids. Thanks for sharing!
~Megan
http://elementaryartroom.blogspot.com
So nicely put together! I love these kinds of projects.
I love this! What a great idea. The folk art theme is so pleasing. Well done!
I ADORE this collaborative project! What a great combination of colors, textures and designs.
I think I have gone back to your blog to look at this project 10 times in the past week! We are thinking of attempting something similar, but had a question about the framing. The piece would be rather heavy I expect with all that cardstock on pastel paper and was wondering if anything special had to be done to prep it before it was framed. Any advice or guidance would be really appreciated!
Kristin- let me go into more detail for you. It's heavy, but not too bad. For wall mounting purposes one would want to be sure to use a hanging device meant for 50lbs plus. You could even tape one to the back for the buyer.
First of all, I actually misspoke on the frame size. I edited the post to correct. the final frame size is 30x24.
I purchased my supplies at Michael's which is a craft store. You might have something similar?
First I started with a large piece of matboard from the framing department. I cut it to 30x24. From the photos you can see some pieces extend over onto the mat. This is not a typical mat with the hole cut to put over the piece. The artwork is actually assembled on top of the matboard to give the illusion of being matted.
The pastel paper is very lightweight. I used Canson Mi-Tients. It comes in a variety of colors. It is 25x19. I bought a blue and yellow-orange. Working horizontal I did cut both pieces so they overlapped a little bit at the horizon line. It got rid of a lot of the paper. I would not make this cut until you see where your horizon line is, and that will depend on the layout of the houses. You can see on mine that the yellow paper extends up to the 3rd row of houses to ground them.
The blue paper was covered with a light all over scribble with light blue and white oil pastel. I wanted to keep the childlike quality. The yellow-orange paper I made little grass marks with two colors of green pastel, yellow, white, and blue.
I used rubber cement to glue the blue and yellow papers on the white matboard.
The hardest part was arranging the houses. I probably moved the houses around and around for an hour! Once decided I used acid free large glue dots to put the houses, trees and shrubs down. I had some of the trees go over onto the matboard.
These frames with equipped with dhooks on the back. I went ahead and wired it for hanging.
I am happy to help with any other questions! Hope this helped some.
:) Erin
Erin, thank you so so much for all the extra details! I'm really hoping to try this for our school's annual silent auction.
Fantastic Job! I'm trying something similar right now using a mountain backdrop and pine trees. In search of paper that is big enough. My mat board is 37x40. So i'm looking for something that is at least 33x36. If you have any ideas, please let me know. Thanks! I'll get back with a link when we're finished.
Olive and Love,
I can't think of paper that is that big except for butcher paper on a roll but then I think you face a paper that is not archival. There is color paper on butcher paper but again, it is not acid free and it will fade. I had to use two pieces of the pastel paper, but the width is only 25 inches. You might be able to just color and collage directly on the matboard but you will lose some of that color pop. I'm sorry I don't have any other suggestions! I can't wait to see what you come up with! I love the mountain idea!
Erin
I think I am going to paint the scene with acrylic. Black mountains. Night time blue sky. Then may add oil pastels on top. Wondering if a finishing acrylic spray would look okay over it. It's looking great over each house to seal the oil pastels. Going to paint and spray a sample piece today. Considering also doing two as a cohesive two part piece. Both fine individually as well. Perhaps auctioned off individually as well.
I'll keep you posted. Thanks for the inspiration. Check out last year's auction project:
http://www.oliveandlove.com/2010/03/vase-with-flowers-school-auction.html
I love this so much! Did you put any finishing varnish spray on the final art before framing it? Do the oil pastels smudge at all?
Kara, Oil pastels by nature do smudge. If your children or students have not used them before I would experiment on paper first. I remind children to keep the pastels upright and not to drag their hand across the pastels. I did not varnish or seal since the piece is under glass it is fine! Good luck and I hope it goes well! Thanks for stopping by!
Erin
Finished the piece! Looks great. Thanks for your help!
http://www.oliveandlove.com/2011/02/our-neighborhood-childrens-auction-art.html
Wonderful neighborhoods! Such a bright and cheery fun place to visit!
Attempting this cute idea for our schools auction. I had the students decorate their houses today, brought them home and no matter how I arrange, they won't fit on my matboard! What size approximately is each house and apartment? I'm thinking I need to go way smaller but want to get it right the second time around. There will be 16 houses total. Thank you!
It’s quite vibrant; I’m sure the kids would have loved it. I’m not that creative which is why whenever my nephew asks for help from me in this regard; I buy him online services just like I pay someone to do my essay. I hope he never gets to know(lol).
fantastic neighbourhoods Such a cheerful and enjoyable location to visit
"It takes a village" is a powerful phrase that reminds us of the importance of community and collaboration. It emphasizes the idea that we are not meant to navigate life's challenges and joys alone, but rather, we thrive when we come together and support one another. ac repair in Ajman
Unlock unparalleled academic prowess with the premier essay assistance in the UK. Tailored expertise awaits, best essay help uk poised to elevate your writing endeavors to unparalleled heights with just a click.
Assignment editing and proofreading are crucial for academic success. By meticulously reviewing your work, you can ensure clarity and accuracy, ultimately elevating the quality of your assignment editing proofreading
Very helpful article, thank you for sharing! Abogado de Divorcio Hampton VA | Abogado de Divorcio Hampton Virginia
"Se necesita un pueblo" es una frase poderosa que nos recuerda la importancia de la comunidad y la colaboración. Enfatiza la idea de que no estamos destinados a afrontar solos los desafíos y las alegrías de la vida, sino que prosperamos cuando nos unimos y nos apoyamos unos a otros.abogado tráfico chesterfield virginia
This is very interesting, I love how you express yourself in form of writing.
You’re a very skilled blogger. thank you
Good blog you have got here.. It’s hard to find quality writing like yours these days.
Thank you for sharing.
Post a Comment